What Materials to buy
Open your wallet and recharge the credit card, you are about to spend a bucket load on your Indoor Rock Climbing Wall! Nah, its not that bad 🙂
What I’m going to do with this page, is tell you what I did to choose materials, the quantities I bought, and a rough price of each thing. That way, when you have picked the wall, you might get some idea how much it will cost you. This is only for materials to build the wall, I will cover climbing ropes, harnesses, climbing shoes and climbing holds on another page. Although, climbing holds will be touched on because it will influence the attachment method and relating hardware.
Okie dokies! Lets go shopping! NOTE: I am in Australia, so no doubt I will slip into local currency and units of measure… sorry bout that!
First thing you need to know, “how big is that wall?” Best way to find that out is to ask the person holding the main part of the tape measure what the numbers say on it. Then I recommend drawing a quick sketch of the wall and write the height and width on the corresponding sides. Drawing your sketch to rough scale is even better, especially if you have an odd shaped wall, like mine. Now, using the same scale, try to divide your wall into 2400mm x 1200mm (8ft by 4ft) rectangles, can be verticle or horizontal, in such a way as to minimize waste, which saves you money. That is the common size for the plywood I used. Remember, you can use any “off cuts” on another part of the wall eg. if one part only uses half a sheet, the remaining half can be used somewhere else. I probably could have worked it out to use 1 less sheet than I did, because I have angled cuts, but in the end, I decided it was way easier to mount less sections of ply than to save money on 1 sheet of plywood. More, larger sections will make it easier to fix to the studs in the wall as you may not have anything to fix that 1ft square bit of ply onto…

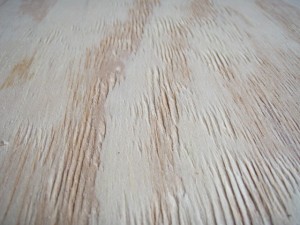
So got an idea of how many sheets you need? 4? wow, same here! Lucky for me, there is a shop nearby that deals in sheets of timber (Mr Ply) and they know about ply, let me tell you! After chatting to the disbelieving storeman about what I wanted the ply for, he recommended 15mm Structural Ply at about $70 a sheet. Most hardware stores can probably get something similar. The idea behind structural plywood is that it is made to certain standards and tested to some sort of standard also, this also means it is not pretty like a nice sheet of ply you might use in furniture building. You know what I say? Good! I want the grainy textures and knots on the surface!
Running Total AU$ : $ 280
Once the ply was at home, I set about working out how regularly the climbing holds would be placed on the wall. With some prior visits to indoor rock climbing walls at various climbing gyms, I recalled the climbing holds set out in a grid, either squares or diamonds. Personally, diamonds appear less structured. Not actually measuring one at a gym, I guesstimated about 400mm between holds horizontally, starting 100mm in and up for the first row. Second row, 300mm in and up… now I’m confusing myself, there will be more detail and photos in the build page. Basically, mark up each side at 200mm, starting 100mm up from the bottom, same across top and bottom. Eventually a grid of 200mm squares is formed, with a 100mm border. Count the amount of times the lines cross, then halve it. Don’t ask me how I came up with that, it was a fluke, but it worked 🙂 Write this number on your hand. If you are buying “screw-on” climbing holds, you dont need to plan anything, you can just screw em on where ever you please. I prefer “bolt-ons”, as all the gyms I have been to use them, must be for some good reason.
Next stop was the fasteners shop. All these shops do are nuts, bolts, screws and everything in between, in any size, colour, quantity, material… you get the idea. This time I phoned around knowing a little about what was needed, and getting prices of the major items. Once again having to explain my project to everyone I rang. The shop I picked was Specialized Wholesalers, I know, their name doesn’t really give too much away. The dude was easy to talk to, knew his stuff, was interested in my project and assured me he would beat any prices I already had. In I went for a visit, as soon as I asked for the bloke I spoke to, he yelled from where ever he was hiding, “Thats the guy who is building an indoor rock climbing wall… in his house!” After a few “aaah’s” from the other salesdudes, out he came. He was great!

Sidetrack: My wife also likes to “help” with my projects, especially this one seeing as how it was for her birthday. So I felt now was the time to let her have a go. “Ask the nice man what we are after dear”. “Nuts?” was her helpful question directed at a man who works in a shop with about 5000 different nuts on the shelf. Ahh women 🙂
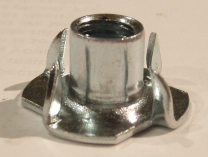
T-nuts (tee nuts). These little beauties get bashed into holes on the back of the ply so when bolts go through, there is a nut there waiting to hold on securely, read the number from your hand for the quantity (using my way, 36 per sheet x 4 sheets = 144, get 150). The climbing holds I bought recommended 3/8th gauge bolts. Whatever bolts best fit your holds, make sure you match them with the correct T nuts. M10 looks the same as 3/8th, trust me, they aren’t. I paid 27c each for the 3/8th ones, $40 just about covers it.
Running Total AU$ : $ 320.

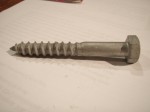
How do attach it to the wall? Lucky you asked! There are a number of fixing hardware solutions. First you could put wood screws in about every 300mm along the studs, this is what most climbing gyms do. Its a lot of drilling… My idea of a climbing wall is to be able to remove it if I want to and not have to patch a billion holes to make the wall presentable again. So I went with Galvanized Coach Screws or Bolts. A washer under it spreads the load a bit more and 6 to 8 per sheet holds it easily, thats why we wanted structural ply, its solid as a rock… hehe… a rock climbing wall made of wood thats as solid as a rock, lol. Anyway, the M10 x 75mm coachies including a washer was about $0.60 ea, 30 of em = $18.
Running Total AU$ : $ 338.

After the climbing wall was finished, I decided the coach screws looked a bit industrial. Countersunk Hex Screws or Batten Screws look heaps better so I started replacing the coachies with them (not in the same holes, too small for that) they are not as easy to find at a regular hardware store and usually only come in a pack of 5 or so… because they are weaker than a coach screw, I would put more, maybe 12 per sheet at a minimum. Galvanized 75mm ones range from $0.11 each if you have need of 1000 or up to $1.20 each if you have to buy packs of a couple. Allow about $25 to get some spares, near enough to the coach screw price. In the how to build an indoor rock climbing wall section I will show you how much better they look.
Running Total AU$ : $ 345. if you use batten screws instead of coach screws.
 Cap Screws or Socket Head Cap Screws. The next bit is a little tricky. Because I bought my climbing holds before I started the indoor rock climbing wall project, I was able to measure the length of bolt needed to go through the climbing hold + a maximum of 15mm (for the thickness of the ply) so as to not penetrate the gyprock wall behind it, allowing me to remove the climbing wall at a later date and not have a billion holes to patch. I don’t know about the various brands of climbing holds, but surely they would have some sort of standard hole depth. 90% of mine used a 1.5 inch length bolt (all 3/8th diameter remember, don’t mix metric with imperial eg. a 3/8th 75mm bolt doesn’t exist). A couple used the size longer, the rest 1 size shorter. 50 climbing holds I had, so 60 cap screws I bought, spares of each length just in case. I found the cap screws sat better in the holes on the climbing holds with a bevelled washer under them. For around $0.70 for a cap screw an washer combination x 60 adds $42 to our total.
Running Total AU$ : $ 387.

This next item is optional. A 115mm Screw Eye. In most indoor rock climbing gyms, they have an anchor point on the floor where the person on belay can be attached to the floor, this allows for lighter belayers than climbers without the falling climber hoisting the belayer off the ground. I didnt want to put aything through my floor so an anchor point low on the wall and into the stud servers the same job. Find a solid looking one around $4.
Running Total AU$ : $ 391.
Paint… How expensive is paint?! Talk to paint dudes, they know about paint. Depending on colours you want, size of the wall, how many coats you want, they will know how much of what to sell you. I used a plain cheap white as a base coat/primer. 1 Litre did 4 sheets, just. I got a grey mixed up in a cheap 4 litre tin, then bought a 1 litre tint in a browny colour. The tint you can add yourself if you want different shades as you go along, cheaper than getting all the various colours you want mixed for you. Cheap is the key… are you honestly going to want an easy clean paint? Or a sun resistant tough wearing paint? Why? Its meant to be a rock face, dirty and worn! I added sand to mine for texture and grip so unfortunately cleaning is out 🙂 With some brushes (people like to “help out” by this stage), a roller, roller tray and paint, don’t be shocked if it gets to $100, if you shop around you could get cheaper, I was lazy…
Indoor Rock Climbing Wall materials Total AU$ : $ 491. Bargain!
Have I forgot anything? That should be all the building hardware required. Items related to climbing like anchors, slings, atc’s, climbing ropes, climbing harnesses, climbing shoes and climbing holds will eventually have their own page and add 200 to 300 bucks to the total for half decent stuff. Let me know if I have left anything out of this page! Or if you have any questions, write a comment below. Cheers! See you in the “How To Build an Indoor Rock Climbing Wall” section!
I go to Wal-Mart for everything!
Hi there, simply became aware of your weblog thru Google, and found that it is really informative. I?m gonna watch out for brussels. I?ll be grateful in case you proceed this in future. A lot of other people will likely be benefited from your writing. Cheers!
Where did you find the holds? There seems to be a lot of variety and are pretty expensive. I’m just looking for something basic for kids under 10.
I found them on ebay, I didn’t want the colourful plastic looking ones, these feel rocklike too!